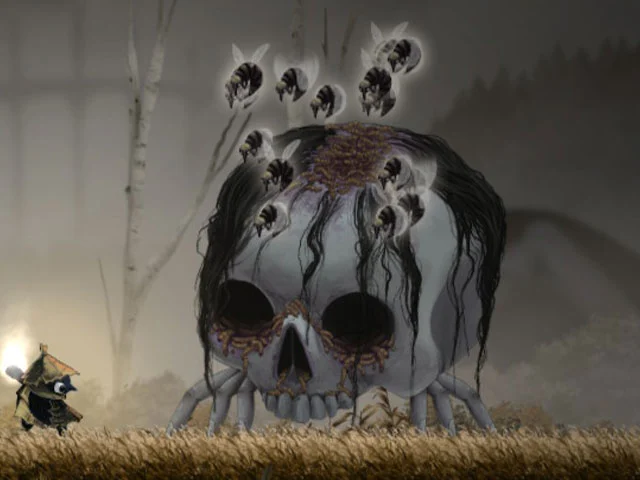
Today I’m bringing you The Swarm, the second boss in Well Dweller. Once again it’s a pretty disturbing boss, and once again it doesn’t disappoint. Well, at first it seems like a bit of a lame boss because it’s just a swarm of flies, until they decide to take control of a skull lying around.
As for difficulty, it’s not especially hard, to be honest. That said, the last phase (it has 3) is pretty tough. Luckily, it only kicks in once the boss is down to 1/3 of its health, so it doesn’t last that long.
Table of Contents
Location: The Bog
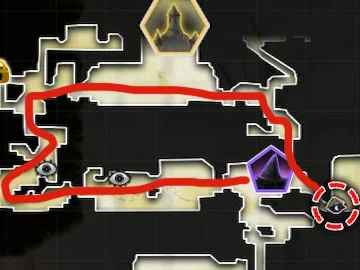
The fight against the Swarm takes place at the end of your trek through the Bog, and even though the arena itself is where I’ve marked it in the image, you’ll have to take the detour I’ve marked. Shortly before you get there, you’ll pass the entrance to the Queen’s Castle, but you won’t be able to get in until you have 7 Golden Feathers (which you’ll get much later on).
Phase 1 Attack Guide
These are the boss’s attacks at the start of the fight:
- Fly Charge: A couple of flies show up at ground level, one from the left and one from the right, and charge at you (first one, then the other). They always stay along the ground, so it’s as easy as jumping and letting them pass underneath you (you can also use the dash). Don’t attack them; they disappear on their own.
- Mud Shield: A shield of mud surrounds the Swarm, and you’re better off not attacking it here. Instead, keep running and use the dash to go through the Swarm if it gets too close (it’ll chase you). When the attack ends, be careful, because it’ll fling the mud at you as a projectile and you’ll have to dodge it.
- Moving Fly Wall: This one is more of a little platforming minigame. First use the bubbles to jump over the flies, then dash through the wall of flies coming at you, and finish it off with a jump. Done.
Phase 2
Phase 2 starts roughly once you’ve knocked off 1/3 of the boss’s health. At that point you’ll see the flies pull away to grab the skull at the back of the arena. Now the boss becomes that skull, controlled by the flies (the Swarm).
Its attacks change completely:
- Mud Balls: It throws a ball of mud (one in each direction) that bounces (lower each time) and keeps breaking into smaller mud balls. The easiest thing is to stay away from the mud, because being close to it is pretty annoying to deal with.
- Jump: The skull takes a huge leap, so be careful it doesn’t land on you. On top of that, when it hits the ground it sends a shockwave along the floor that you’ll have to jump over. Once you’ve jumped to dodge it, it’s a great moment to hit it a bunch.
- Mud Charge: It runs a bit to one side (not very far, honestly) while throwing small mud balls.
Phase 3
This phase starts once the boss only has 1/3 of its health left, and this is where things actually get interesting, because it’s sort of a fusion of phases 1 and 2. In other words, the flies will do the same things as in phase 1 while the skull keeps doing the same things as in phase 2; both at the same time.
Strategy and Tips
First, 2 really key tips:
- Always try to hit as many targets as you can at the same time, since every hit takes health off the boss. Even though there are a lot of enemies, the boss is all of them together. In phases 2 and 3 it really helps to hit the skull and the flies at the same time; you’ll notice its health drops really fast that way.
- Don’t forget to keep using the Flaming Vessel. That also helps bring the boss down faster.
Trinkets I recommend:
- Silver Ring: Slightly increases damage dealt.
- Hair Pin: If you don’t attack for 8 seconds, your next attack deals double damage.
Honestly, it would be better to swap the Hair Pin for the Scrap of Fabric (slightly increases attack damage while in the air), but I didn’t have enough Trinket Slots.

And that’s it! What did you think of Well Dweller‘s second boss? Pretty interesting what happened with the Swarm in phase 2, right? Leave a comment!